Buttons in the Duda System: Linking
Buttons play an integral role on a website, guiding user action. Buttons are crucial in ensuring that users have ample opportunity to convert on every page. For example, a button could encourage a visitor to submit a contact form or call a business.
In this content, we outline two primary button linking options: basic hyperlinks and pop-up activation. In Part 2, we’ll discuss how to style buttons to match your website.
Let’s get started!
Adding a Click-to-Call Button
1. Right click on the row you would like to add your button to. Select “New Column.”
2.
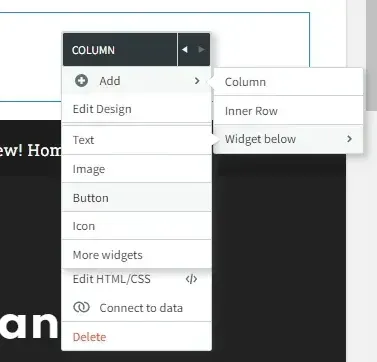
Right click on your empty column, hover over “Add,” then over “Widget below,” and then select “Button.” Alternatively, navigate to “Widgets” on the leftmost Duda menu and click and drag a “Button” widget to the empty column. On Duda, button styles are set globally, so your new button will already be properly formulated.
3. Click on the new button to access the “Button Content” editor. Here, you can adjust button text. Enter your preferred business phone number.
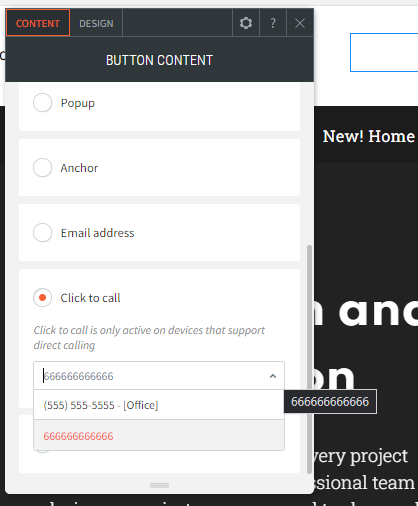
4. Whenever a button is added to a website, Duda will automatically link the button to an existing page from your standard pages menu. Scroll down on your “Button Content” editor to find the “Click-to-call” linking option. Select the corresponding number.
Adding a Pop-Up Button
All pages on your website should include a means of conversion, because you must tell your users what to do with the information presented to them. Unfortunately, contact forms and calls-to-action are one of the least utilized elements on websites.
On the other hand, not every page on your website needs a full-blown contact form. This is where the pop-up button comes into play.
In the example below, we added a pop-up button linking to a small contact form, allowing the user to convert without disrupting their flow through the website. Once the form is completed, the user can exit the popup and continue their journey through the website.
1. We started with a “Contact Us” button at the bottom of our page. Click on the button to access the “Button Content” editor.
2.
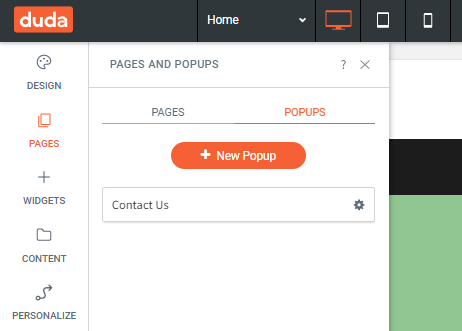
Scroll down the list of linking options, and select “Popup.” This provides access to pre-created popups. To create a new popup, navigate to the Pages tab on the leftmost menu of your Duda editor. Toggle to “Popups.” From here, you can create a custom popup.
Once you’ve created a popup, select this from the linking options on your “Button Content” editor.
3.
Click “Preview” on the top menu of your Duda editor to view your pop-up button in action.
Are You Interested in More Duda Tutorials?
Stay tuned for Part 2 of our series on buttons in the Duda system where we discuss how to style your buttons! For more Duda tutorials, head over to our YouTube channel or browse the
RivalMind resource library.

Meet the Author
Harley Helmer
Lead Search Marketing Strategist
Harley Helmer is a digital marketing professional with nearly a decade of experience in the industry. Today, he's the head of search marketing strategy at RivalMind, responsible for developing and executing comprehensive SEO campaigns that improve online visibility and boost organic traffic. His pragmatic, no-nonsense approach to marketing – paired with a robust knowledge base – helps him deliver innovative solutions to technical challenges and deliver real client success.
Specialties: SEO Gold Mine, Idea Guy
Looking for more organic website traffic?
Welcome to RivalMind. Our purpose is to help your business thrive. We are a digital marketing agency that offers SEO, PPC, Web Design, Social Media and Video Solutions as tools to our clients for online business development and growth.
Contact us today to get started!
Blog Contact Form
Connect with Us:


